
Choosing the best Wire Crimping Tool in 2026 depends on more than brand or price. The right tool should match the terminals, wire gauges, and workload you handle. A compact ratcheting crimper may suit occasional repairs, while a bench-mounted model can offer better leverage for repeated jobs. Neither is automatically the right choice.
A good crimp should hold securely without cutting strands or deforming the connector. Look for clearly marked gauge ranges, compatible die profiles, comfortable handles, and a release mechanism that works smoothly. Check the manufacturer’s specifications against the terminals you actually use; similar-looking connectors can require different dies. Small details matter. So does fit.
This guide compares practical features, including crimp consistency, adjustment options, durability, and ease of use. It also considers what a tool can—and cannot—tell you about a finished connection. A neat-looking crimp is not proof of a reliable one. Use the correct terminal, prepare the wire carefully, and follow the tool maker’s instructions. Where possible, inspect and test sample crimps before relying on a tool for regular work.
There is no single winner for every workshop. A professional installer, a vehicle owner, and a hobbyist may value different things. Price matters, but a low-cost tool can become frustrating if its jaws misalign or its range is too limited. I would treat any broad “best” claim with caution. The recommendations ahead focus on matching tool design to real tasks, while noting trade-offs that product listings often leave out.
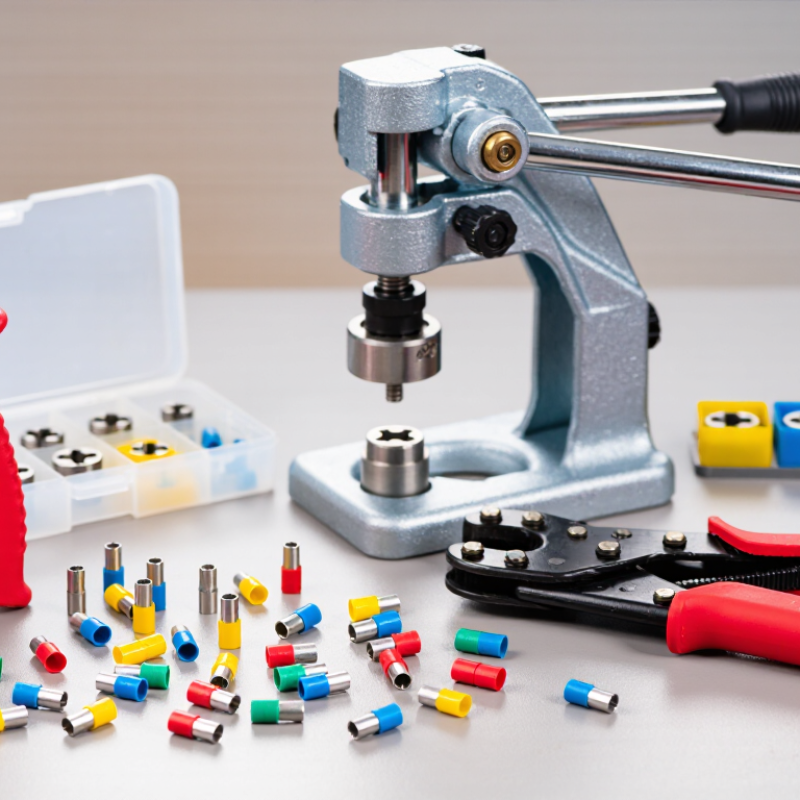
A wire crimping tool joins a wire to a terminal by compressing the terminal’s metal barrel around the conductor. The tool’s shaped dies apply controlled pressure, deforming the barrel without cutting through it. Done correctly, the strands stay gathered, and the terminal grips them firmly. The result is a mechanical and electrical connection—not a soldered joint.
A snug crimp depends on matching the tool, terminal, and wire size. Too little compression can leave gaps and increase resistance; too much can damage strands. Small details matter: strip length, clean copper, and the terminal seated squarely in the die. A little awkwardness here can be instructive: a crimp may look tidy while hiding a weak grip.
The U.S. Fire Administration’s analysis of 2017–2019 data estimated about 24,000 residential building fires annually involving electrical malfunction. That broad figure does not identify crimp failures, but it underscores why connection quality deserves care. NASA-STD-8739.4A and IPC/WHMA-A-620 describe workmanship checks for crimped connections, including visual inspection and mechanical testing. At the workbench, inspect for stray strands, an even barrel shape, and insulation held without being crushed. A pull test helps, too. Don’t trust appearance alone.
What Is the Best Wire Crimping Tool in 2026?
Main Types of Wire Crimping Tools and Their Uses
Wire crimping tools are not interchangeable. The right choice depends on terminal style, wire gauge, and how often you make connections. A basic manual crimper suits occasional repairs and simple insulated or non-insulated terminals. Its handles provide direct feedback, though hand pressure can vary. Slow down. Match the die to the terminal and wire range.
Ratcheting crimpers keep their jaws closed until a full cycle is reached, helping produce more consistent crimps during repeated work. They are useful for automotive connectors and workshop wiring. Some use interchangeable dies, but each die must fit the connector specification. For ferrules, choose a dedicated ferrule crimper. Its square or hex profile can help strands sit neatly in a terminal block. A universal jaw may not be a reliable substitute.
Coaxial crimpers use size-specific dies for cable connectors. Hydraulic or battery-powered tools reduce hand effort on larger lugs and heavier conductors. They suit frequent, high-force jobs, not every small repair. Check compatibility between the connector, conductor, and die. Inspect the finished joint for even compression, stray strands, or damaged insulation. A gentle pull test can help when the application allows it. A crimp may look tidy and still be loose; appearance alone is not enough. Tool charts help, but a test with the actual wire can reveal an awkward fit.
Main Types of Wire Crimping Tools and Their Uses
How to read this chart: The bars show nominal copper conductor cross-sectional areas for common AWG sizes. Use the wire size printed on the cable to help select a crimper and die that match the terminal manufacturer’s specified wire range.
Areas are rounded nominal AWG values. Always follow the terminal and tool specifications; wire size alone does not determine the correct crimp die.
The best wire crimping tool is the one that matches the terminal, wire size, and job conditions. Start by checking the connector’s specified wire range. A tool made for insulated terminals may not form a reliable crimp on an open-barrel contact. Match the die profile to the connector, not just the wire gauge. Close fit matters.
For repeated work, a ratcheting tool can help apply consistent pressure and prevent an incomplete cycle. Look for clear gauge markings, dies that seat securely, and handles you can operate without straining your wrist. If you work in tight spaces, a compact tool may be easier to position, though its shorter handles can require more hand force. No tool is perfect.
Before committing to a tool, crimp a few sample terminals using the wire and connectors you actually plan to use. Inspect each crimp for even compression, loose strands, or damaged insulation. A gentle pull test can reveal a weak connection, but it does not replace the connector’s specifications or appropriate testing. I would also check whether replacement dies are available; it is easy to overlook that detail when comparing tools. A clean, repeatable crimp matters more than extra features.
A wire crimper is only compatible when its die matches the terminal, wire gauge, and conductor type. Check whether it handles insulated or uninsulated terminals, and whether the die profile fits the connector barrel. A loose match can leave a polished-looking crimp with a weak pull-out hold. Not obvious at first. The IPC/WHMA-A-620E workmanship standard defines three acceptance classes, reflecting different end-use requirements. Use the class relevant to your assembly rather than assuming one crimp suits every job.
For precision, look for consistent ratchet release, a stable locator, and a clear way to verify crimp height. IEC 60352-2:2020 covers solderless crimped connections and their test methods, a useful reference when comparing tool claims with connection performance. A tool’s printed gauge range is not proof of repeatability; sample crimps should be checked against terminal specifications. For durability, inspect die edges, hinge play, handle return, and whether worn parts can be replaced or recalibrated. I would not judge this by weight alone. A heavy tool may feel solid, yet still develop die misalignment. Keep a few test crimps from each setup; they make comparisons easier, though they cannot replace proper measurement.
| Tool Type | Typical Compatibility | Precision and Control | Durability Considerations | Best Suited For | Key Limitation |
|---|---|---|---|---|---|
| Ratcheting insulated-terminal crimper | Insulated ring, spade, and butt terminals within the tool’s marked wire-size range; commonly sold for ranges such as 22–10 AWG. | A ratchet holds the jaws closed through the crimp cycle, helping produce consistent crimps when the correct terminal cavity is selected. | Steel jaws and a replaceable or well-maintained ratchet mechanism can support repeated hand-tool use. Keep the pivot clean and check jaw alignment. | General electrical repair using compatible insulated terminals. | Not designed for every terminal style; a crimp that is too large or too small for the selected cavity may be unreliable. |
| Non-insulated terminal crimper | Uninsulated terminals such as open-barrel or closed-barrel types, depending on the jaw profile and die set. | Correctly matched dies can form the conductor and terminal barrel without relying on a plastic insulation sleeve for support. | Die shape and alignment matter. Replaceable dies can extend service life if the tool is designed for them. | Automotive, appliance, and panel wiring where uninsulated terminals are specified. | Terminal styles are not interchangeable; confirm the die profile against the terminal manufacturer’s requirements. |
| Ferrule crimper | Tubular wire ferrules; common tool ranges include approximately 0.25–10 mm², with larger ranges available on some models. | Square, hexagonal, or trapezoidal dies shape the ferrule around fine-stranded wire. A self-adjusting mechanism can cover a range of ferrule sizes, but must still be checked for fit. | Repeated use can wear the die surfaces. A secure, even crimp depends on clean jaws and the correct ferrule size. | Preparing stranded conductors for screw-clamp terminals in control panels and similar equipment. | Ferrules are not a substitute for terminals designed for other connection methods; die shape can affect fit in a terminal. |
| Modular plug crimper | Specific modular plug formats, such as 6-position or 8-position plugs; compatibility depends on the tool’s connector slots and plug type. | Positions the plug and conductor contacts for a single squeeze. Integrated cutting or stripping features vary by design. | Alignment of the connector cradle and contact-driving blades is important; damaged or worn blades can cause poor contact termination. | Installing compatible modular connectors on communications cables. | Does not crimp ordinary wire terminals. Plug format and cable construction must match the tool. |
| Hydraulic lug crimper | Large copper or aluminum lugs matched to the tool’s die set and rated conductor range; capacity varies widely by model. | Hydraulic force reduces the hand effort needed for large connections. Correct die selection and the specified number and position of crimps remain essential. | Requires inspection of the ram, seals, return mechanism, and dies. Keep the hydraulic system clean and follow the service instructions. | Large conductors and power connections where a compatible lug and die system is specified. | Heavier and less portable than hand crimpers; not suitable for small terminals or connectors outside its die range. |
| Interchangeable-die ratcheting crimper | Multiple terminal families only when the correct compatible die set is installed; supported wire sizes depend on each die. | Can provide repeatable results across several applications when dies are accurately matched and fully seated. | Die retention, alignment, and ratchet condition affect service life. Additional dies should be stored to prevent damage or loss. | Users who work with several compatible terminal types and want one handle system. | “Interchangeable” does not mean universal; verify that each die is intended for the specific terminal and conductor. |
Selection note: The best crimping tool is the one matched to the terminal, conductor material, wire size, and required crimp profile. Size ranges shown are typical examples, not universal specifications; check the tool and terminal documentation before use. For critical connections, inspect the crimp and perform the required pull or continuity checks.
A safe crimp begins with the right tool and terminal for the wire gauge. Check the markings on both before you start. Disconnect power, then strip only enough insulation to fill the terminal barrel. Keep every strand intact. A nicked conductor can weaken the connection, even when the outside looks tidy. Wear eye protection; small wire offcuts can flick unexpectedly.
Place the terminal squarely in the matching die, with the barrel positioned as the tool instructions specify. Squeeze the handles through a complete cycle if the tool uses a ratchet. Don’t force a partial crimp or reuse a crushed terminal. Give the finished connection a firm, controlled tug. It should not slide or loosen. A neat-looking crimp can still be weak; appearance alone is not proof. That check is easy to rush.
After use, brush wire fragments from the jaws and wipe away dust or moisture. Store the tool dry, with the handles relaxed if its design allows. Inspect the die faces for chips, rounded edges, or buildup. Check the pivot and ratchet for smooth movement. Avoid oil on the crimping surfaces, and follow the tool’s care instructions for lubrication. If crimps become uneven or the ratchet behaves differently, stop and have the tool checked. I’d rather pause over one questionable connection than trust it blindly.
QUICK LINKS
CONTACT US
Office: (+86) 755 23040566
Tel: (+86) 158 9965 5195
E-mail: sale@pcbledmodule.com
Skype: Hans@Rocket-PCB
Whatsapp: 86 1589965 5195
Office Address: 2207,Bid 4,He Gu Shan Hui Cheng,35#,Guang Tian RoYanluo street, Song Gang Town,518105 SHENZHENG, CHINA
Plant ADD.: No 69, Lianfeng North Road, Xianxi Area, ChangAn Town, Dongguan, China.


Copyright © 2025 Rocket PCB Solution Ltd. | All Rights Reserved Sitemap Friendship link: CNC machining heat sink